
How To Tune A Recurve Bow: An Ultimate Guide!
Recurve bows have been used for centuries for hunting, sport, and warfare. These bows are known for their elegant, curved shape and their ability to shoot arrows accurately over long distances.
However, to achieve the best results with a recurve bow, it is essential to properly tune it.
Tuning a recurve bow involves adjusting various elements, such as the string, the bow limbs, and the arrow rest, to ensure that the bow shoots accurately and consistently.
But where do you start?
Don’t worry, we’ve got you covered. In this article, we’ll guide you through the process of tuning your recurve bow step by step.
From understanding the components to troubleshooting common problems, we’ll equip you with the knowledge and tools to ensure your bow is shooting like a dream. Let’s dive in and get started!
Understanding Bow Components
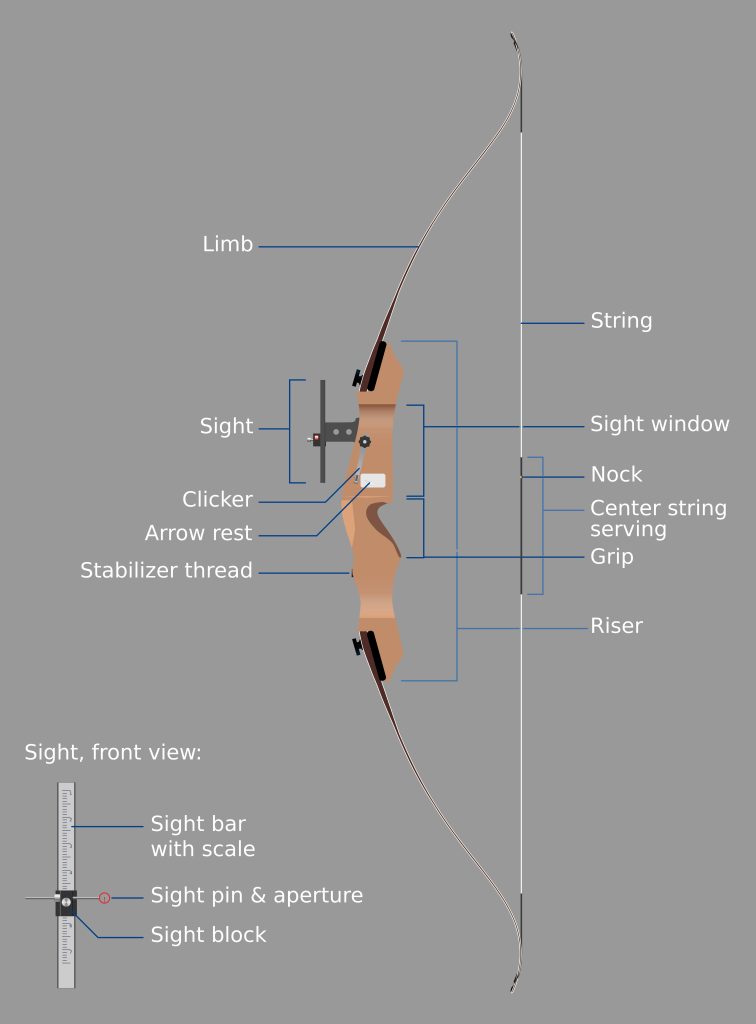
A recurve bow is made up of several components, each playing a crucial role in the bow’s performance. These components include:
- Riser: The central part of the bow where the limbs attach. The riser is where the archer holds the bow and contains the grip and sight window.
- Limbs: The flexible parts of the bow that bend and store energy when the bowstring is drawn back. The tips of the limbs are where the bowstring attaches.
- Bowstring: The string that connects the tips of the limbs and is drawn back by the archer to propel the arrow.
- Arrow rest: The component that holds the arrow in place on the bow.
- Sight: The component used to aim the bow.
Each component of a recurve bow plays a crucial role in its performance. Here’s a breakdown of how each component affects the bow’s performance:
Riser: The weight and balance of the riser can affect the overall stability of the bow. A heavier riser may provide more stability but can be more difficult to hold for long periods of time. The grip on the riser can also affect accuracy, with a comfortable grip being important for consistent shots. The sight window on the riser is where the archer looks through to aim the bow.
Limbs: The length and weight of the limbs can affect the speed and power of the bow. Longer limbs provide more draw length and power but can be harder to control. The weight of the limbs affects the amount of energy stored in the bow when the string is drawn back. Stiffer limbs require more force to draw back but provide faster arrow speeds.
Bowstring: The material and length of the bowstring can affect the speed and accuracy of the bow. A shorter bowstring provides more power but can be less accurate, while a longer bowstring provides more accuracy but less power.
Arrow rest: The position and type of arrow rest can affect the trajectory of the arrow. A properly positioned arrow rest can help ensure consistent shots.
Sight: The sight on a recurve bow is used to aim the bow. The type and quality of the sight can affect accuracy, with higher-quality sights providing more precise aiming.
Understanding how each component of a recurve bow affects its performance is important for tuning the bow for optimal performance. Making adjustments to these components can help improve accuracy and consistency in the shooting.
Let’s move on to how to set the bow first;
Setting up the Bow
When it comes to archery, setting up your bow is just as important as understanding the components that make up the bow.
To prepare for tuning a recurve bow, it’s important to first assemble all the necessary components. This includes installing the arrow rest, clicker, sight, and stabilizers. Now, Let’s see the next steps;
Initial Set Up & Selecting The Right Poundage
To begin the process of tuning your recurve bow, it’s important to first set the correct nock fit, poundage, and tiller for your bow.
While you can make slight adjustments to the poundage to aid in tuning, it’s recommended to set it at a manageable level from the start and maintain it throughout the process.
Shooting a bow that is too heavy for you can make it difficult to shoot properly, even if your tuning is on point.
Adjusting Poundage
Adjusting the poundage of a recurve bow is an important aspect of tuning the bow to your personal shooting style and preferences.
The poundage of a bow refers to the amount of force required to pull the bowstring back to its full draw length. To adjust the poundage of a recurve bow, follow these steps:
- Determine the current poundage: Before making any adjustments, you need to know the current poundage of your bow. You can measure this using a bow scale, which can be purchased at most archery shops.
- To begin adjusting the poundage, locate the limb bolts on your bow. Most recurve bows have two limb bolts, one on the upper limb and one on the lower limb. The limb bolts will be on the side of the bow opposite to the limbs.
- To increase the poundage, use a limb bolt wrench to turn the limb bolts clockwise. To decrease the poundage, turn the bolts counterclockwise. It is important to adjust both limbs equally to maintain the balance of the bow.
- You can adjust the limb bolts a quarter turn at a time and then shoot a few arrows to see how the changes affect your shot.
it’s important to follow the manufacturer’s recommendations for maximum poundage to prevent damage to the bow or injury to the shooter.
Selecting the right arrows
Choosing the right arrows for your recurve bow is crucial for optimal performance. Arrows come in various sizes, materials, and stiffness.
The stiffness of an arrow is measured by its spine, which is the degree of flex the arrow has when pressure is applied to the middle of the shaft.
To select the right arrows for your bow, you will need to know your draw length, draw weight, and arrow length.
The draw length is the distance from the bowstring to the bow grip when the bow is fully drawn. The draw weight is the amount of force required to pull the bowstring back to the full draw.
The arrow length is the distance from the back of the arrowhead to the end of the shaft.
Once you have determined your draw length, draw weight, and arrow length, you can then choose arrows with the appropriate spine stiffness.
A bow with a high draw weight requires an arrow with a stiffer spine to withstand the pressure. Similarly, an arrow that is too short or too long can affect the arrow’s flight and accuracy.
Proper bow string installation
Proper bow string installation is important to ensure that your bow performs optimally and safely.
To install the bowstring, start by placing the string in the bow’s grooves at the tips of the limbs.
Then, using a bow stringer tool, attach the string to the bow by slipping the loops over the limb tips and pulling the bowstring into place.
Make sure that the bowstring is centered and that the brace height, which is the distance between the bow grip and the bowstring when the bow is unstrung, is set correctly. T
The correct brace height will vary depending on the manufacturer’s specifications, so be sure to check the bow’s manual for guidance.
Fitting and adjusting accessories
Accessories like arrow rests, sights, stabilizers, and quivers can all affect your bow’s performance. When fitting and adjusting accessories, it’s important to ensure that they are properly aligned and adjusted.
For example, an arrow rest should be positioned so that the arrow can pass over it without any interference, but also without wobbling or bouncing.
A sight should be adjusted so that the pins or dots are centered and in line with the arrow rest. A stabilizer should be balanced to provide stability and reduce vibrations.
Tiller Adjustment
The tiller refers to the difference in distance between the string and the riser at the upper and lower limbs. A properly adjusted tiller will ensure that the bow limbs are working in harmony, providing a smooth and consistent draw.
Here are the steps to adjust the tiller on a recurve bow:
- Determine the current tiller measurement: Measure the distance from the string to the riser at the top and bottom of the bow limbs. Subtract the smaller measurement from the larger one to get the current tiller measurement.
- Decide on the desired tiller measurement: The recommended tiller measurement can vary depending on the bow and the archer’s preference. Generally, a difference of 1/8 to 1/4 inch is considered acceptable.
- Adjust the tiller: To increase the tiller, loosen the limb bolt on the top limb and tighten the bolt on the bottom limb. To decrease the tiller, loosen the bottom limb bolt and tighten the top one. Make small adjustments at a time, no more than a quarter-turn at a time. It’s important to adjust both limbs equally to maintain the bow’s balance.
- Re-measure the tiller: After making adjustments, measure the tiller again to ensure it is now at the desired measurement.
- Test the bow: Draw the bow a few times and shoot a few arrows to ensure that the adjustment did not negatively affect the bow’s performance. If the bow feels smooth and the arrows are shooting accurately, the tiller adjustment was successful. If not, make further adjustments until the desired tiller measurement is achieved.
Limb Straightening
Properly aligning the limbs of your recurve bow is essential to ensure optimal performance. Over time, the limbs may become bent or deformed, affecting the bow’s accuracy and efficiency.
Aligning the limbs will allow the bow to react better, draw and shoot in a straight line, be quieter and more forgiving, and make it easier to set the center shot.
There are a couple of ways to check the alignment of your bow’s limbs.
You can use a limb gauge or simply lay the bow down and measure the angle it makes with the ground. The limbs should be parallel to the floor for proper alignment.
It’s important to remember to work within the ideal offset range of 1/16 inch to at least 1/8 inch throughout this phase.
To make adjustments, it is recommended that you nock an arrow and verify that the adjustments are within the specification range. This will ensure that your bow is properly aligned and ready for use.
Set up Arrow Rest
Here are the steps to set up an arrow rest on a recurve bow:
- Choose an arrow rest that suits your shooting style and bow setup. There are various types of arrow rests, such as flipper rests, plunger rests, and magnetic rests, each with their own advantages and disadvantages.
- Attach the arrow rest to the bow. Most arrow rests come with a mounting bracket that attaches to the riser of the bow using screws. Ensure that the mounting bracket is securely attached to the bow and is positioned in line with the bowstring.
- Adjust the height of the arrow rest. The arrow rest should be positioned so that the arrow is level with the bowstring when nocked. Use a bow square to ensure that the arrow rest is at the correct height.
- Adjust the angle of the arrow rest. The arrow rest should be angled slightly away from the bowstring to allow the fletching on the arrow to clear the rest during flight. Use an angle gauge to adjust the angle of the arrow rest.
- Adjust the distance of the arrow rest from the bowstring. The arrow rest should be positioned so that the arrow is just touching the bowstring when nocked. Use a bow square to measure the distance between the arrow rest and the bowstring and make adjustments as necessary.
- Test the arrow rest. Nock an arrow and draw the bow to check that the arrow is positioned correctly on the rest and that there is no contact between the arrow and the bow during the shot.
- Fine-tune the arrow rest. After shooting a few arrows, you may need to make minor adjustments to the arrow rest to ensure optimal arrow flight. Use a walk-back tuning method or paper tuning method or a bare shaft tuning method to fine-tune the arrow rest.
Now, we are prepared for tuning, Let’s see the next steps;
Tuning a Recurve Bow
A well-tuned recurve bow is essential for accuracy and consistency in archery.
Tuning a recurve bow can seem like a daunting task, but it is necessary for peak performance.
Here are the steps to tune a recurve bow:
A. Checking the Bow’s Center Shot
The center shot is a crucial step for tuning a recurve bow because it ensures that the arrow flies straight and true. If the center shot is not properly adjusted, the arrow may veer to the left or right, resulting in poor accuracy and inconsistent performance.
To check the center shot, you will need to place an arrow on the arrow rest and draw the bow back to full draw.
When you reach full draw, take a look at the position of the arrow in relation to the bowstring. The arrow should be positioned in a straight line with the bowstring.
If the arrow is pointing to the left or right of the bowstring, you will need to adjust the arrow rest accordingly.
If the arrow is pointing to the left, move the arrow rest to the right. If it is pointing to the right, move the arrow rest to the left. Keep making small adjustments until the arrow is aligned with the bowstring.
It is essential to ensure that the center shot is correctly adjusted as it directly affects the accuracy of your shots.
B. Adjusting the Brace height
Adjusting the brace height is an important step in tuning a recurve bow.
The brace height can affect the bow’s performance in several ways, including the draw weight, arrow speed, and accuracy. The ideal brace height is dependent on the bow’s design and the archer’s preferences.
To know the brace height, the archer must use a bow square, which is a tool used to measure the distance between the bow string and the bow grip.
The bow square is placed on the bow string, and the string is pulled back to the archer’s preferred draw length.
The measurement on the bow square will give the archer the current brace height.
If the brace height is too high, the bow will have a higher draw weight, but the arrow speed will decrease. If the brace height is too low, the bow will have a lower draw weight, but the arrow speed will increase. In addition, the arrow’s trajectory will be affected by the brace height, so it is essential to find the ideal measurement for the bow and arrows being used.
To adjust the brace height, the archer can twist or untwist the bowstring, which will increase or decrease the distance between the string and the grip.
If the brace height needs to be increased, twist the string in a clockwise direction. If the brace height needs to be decreased, twist the string in a counterclockwise direction.
It is important to note that adjusting the brace height will also affect the bow’s overall string tension, which can impact other tuning aspects such as the center shot and arrow spine. Therefore, any adjustment to the brace height should be followed by a thorough check of the bow’s tuning to ensure everything is in balance.
A brace height that is too short can result in the fletching touching the bow shelf, while a brace height that is too long can result in slower and weaker shots.
Finding the optimal brace height can take some trial and error, and it may vary depending on the type of arrows you are using, your shooting style, and other factors.
It’s important to take the time to experiment and find the brace height that works best for you to achieve maximum performance from your recurve bow.
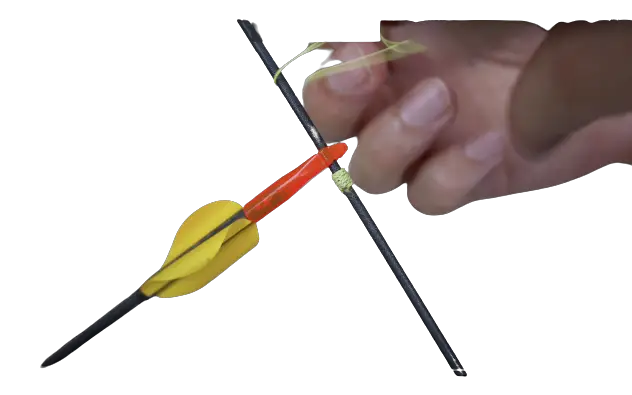
C. Fine-tuning the Nocking point
Fine-tuning the nocking point is an important step in tuning a recurve bow as it can significantly affect the arrow’s flight.
The nocking point’s precise location is dependent on a few factors, including the bow’s draw weight, the type of arrow, and the archer’s shooting style.
To find the correct nocking point, the archer can use a bow square, which is a small tool that clips onto the bowstring and provides a reference point for measuring the distance between the bowstring and the arrow.
The bow square is placed at the nocking point on the bowstring, and the archer can adjust the position of the arrow until it is perpendicular to the bowstring and at the correct height.
If the nocking point is too low, the arrow will fly high, and if it is too high, the arrow will fly low.
The archer can adjust the nocking point by either tying on a new nocking point or by using nocking points that can be slid up and down the bowstring.
It is important to make small adjustments and test the arrow’s flight after each change to ensure that the nocking point is in the correct position.
Additionally, the archer should ensure that the nocking point is consistent from shot to shot. Inconsistent nocking points can cause variations in the arrow’s flight, leading to inaccurate shots.
Archers can use a nocking point tool or a marker to mark the correct location of the nocking point on the bowstring, making it easier to maintain consistency.
D. Bare shaft tuning a Recurve Bow?
Bare shaft tuning is a process used to fine-tune a recurve bow’s accuracy by shooting arrows without fletching, called “bare shafts.” This process allows you to identify any inconsistencies or tuning issues with your bow and make the necessary adjustments.
Here are the steps to bare shaft tune a recurve bow:
- First, shoot a group of fletched arrows at your target from a set distance. This will establish a baseline for your bow’s accuracy.
- Next, shoot a group of bare shafts at the same target from the same distance. Pay attention to the direction and grouping of the bare shafts in comparison to the fletched arrows. If the bare shafts are hitting consistently to the left or right of the fletched arrows, adjust the bow’s center shot accordingly.
- After adjusting the center shot, shoot another group of bare shafts and compare the results to the fletched arrows. If the bare shafts are hitting consistently high or low in comparison to the fletched arrows, adjust the bow’s nocking point up or down respectively.
- Repeat steps 2 and 3 until the bare shafts are hitting the target in the same location as the fletched arrows.
- Once you have achieved a consistent grouping of both fletched and bare shafts, shoot several groups of both types of arrows to ensure the tuning is accurate and consistent
Here is a great video on Bareshaft Tuning Method
Paper Testing the Bow after Tuning
Once you have completed tuning your recurve bow, it’s essential to paper test it to ensure that the arrows are flying straight and true.
The paper test is a simple yet effective way to evaluate the flight of your arrows and make any necessary adjustments.
To paper test your recurve bow, you will need a
- a large piece of paper (butcher paper or newspaper will work),
- a stand to hold the paper,
- and a ruler or tape measure.
Here are the steps to follow:
- Set up the paper: Hang the paper on the stand and mark a small crosshair in the center of the paper.
- Shoot the arrow: Stand approximately six feet away from the paper and shoot an arrow through the crosshair.
- Evaluate the hole: Examine the hole in the paper to determine the arrow’s flight. A perfectly round hole in the center of the crosshair indicates that the bow is tuned correctly. However, if the hole is elongated, it means that the arrow is not flying straight, and adjustments need to be made.
- Make adjustments: Based on the shape of the hole, make the necessary adjustments to the bow. For example, if the hole is elongated vertically, it means that the arrow is hitting the paper nock high, and you will need to adjust the nocking point accordingly. If the hole is elongated horizontally, the arrow is hitting the paper nock low, and you will need to adjust the arrow rest.
- Repeat the test: After making the necessary adjustments, repeat the paper test until you achieve a round hole in the center of the crosshair.
Common Problems and Solutions
A. Overview of Common Issues
Tuning a recurve bow is a crucial step in ensuring its optimal performance.
However, even with careful tuning, issues may arise that affect the bow’s accuracy and consistency.
Here are some of the most common problems that recurve archers encounter:
Arrow flight issues: Arrows that don’t fly straight or consistently can result in an erratic grouping or missed shots.
Inconsistent grouping: If arrows are not grouping well or are scattered around the target, it could be a sign of issues with the bow’s tuning.
Arrow rest problems: Arrow rest malfunctions can cause issues with arrow flight and consistency.
String issues: Frayed strings or improper string tension can cause accuracy problems.
Nocking point issues: If the nocking point is not set correctly, it can cause arrows to fly inconsistently.
B. Troubleshooting Solutions
Here are some solutions to common issues that arise during tuning:
Arrow flight issues: Check the spine of the arrow to ensure that it matches the bow’s poundage and draw length. Adjust the nocking point to ensure that the arrow is properly aligned with the bowstring. Also, check the fletching to make sure it is properly aligned and undamaged.
Inconsistent grouping: Check the brace height and center shot. Ensure that the arrow rest is properly aligned with the bow and the nocking point is properly set.
Arrow rest problems: Make sure the arrow rest is properly installed and adjusted. Check that it is free from any debris or damage.
String issues: Replace any frayed or damaged strings and ensure that the string is properly tensioned. Check that the bowstring is properly aligned with the arrow rest and nocking point.
Nocking point issues: Adjust the nocking point to ensure that the arrow is properly aligned with the bowstring. Also, check the fit of the nock on the arrow to ensure a snug fit.
Remember, tuning a recurve bow is an ongoing process. Regularly checking and maintaining the bow‘s tuning can help ensure that it is performing at its best.
Conclusion
In conclusion, tuning your recurve bow is an essential part of ensuring its optimal performance.
By following the steps outlined in this guide, you can effectively diagnose and troubleshoot any issues that may arise during the tuning process.
Check Walk-Back Tuning Vs. Paper Tuning
Whether you are a beginner or an experienced archer, it is crucial to regularly check and maintain your bow’s tuning for the best results.
Remember, a well-tuned bow not only improves your accuracy but also enhances your overall archery experience.